Ditching WordPress for Jekyll
I am embarrassed to admit but I stayed with Yahoo! Wordpress Hosting way too long. Maybe it was inertia, maybe it was because I hadn’t paid attention to my site in a long time. Whatever the reason was, my recent renewed commitment to revitalizing my blog required that I take another look at my hosting situation. My new goal was to simplify my blogging experience: since I have a propensity to procrastinate when it comes to writing I needed to reduce the friction; I wanted to have very little to think about besides the content itself. That meant moving away from having to maintain my own Wordpress installation and everything that came with it (keeping it up to date, spam free etc). I could have moved to wordpress.com but I wasn’t about to drop $99/year just to maintain a blog under my domain name. I also didn’t need 99% of the features and tools that came with WP. All I wanted was to write in plain text with some embedded code and images. That’s it… OK, maybe some comments as well to entice discussion. But that’s really it!
Jekyll
Enter Jekyll. Much has been written about the tool, its’ numerous merits and how to work with it, so I won’t bother repeating all this here. Just follow the links. The skinny for those of you not familiar with it is this: Jekyll can generate static sites using simple Markdown, Textile or Liquid markup syntax. It also supports HTML but you don’t have to resort to it unless you really need to. Jekyll can also generate blog style pages with posts, permalink support and custom layouts if you really like to get fancy. But chances are if you are reading this you are like me: ditching fancy is why you are thinking about leaving Wordpress in the first place amongst other things.
Since I won’t delve into how to use Jekyll itself, I’ll just go over the steps I took to pick a new host and how I migrated my DNS and email management out of Yahoo! Hosting.
From Yahoo! Hosting to GitHub Pages
First order of business was to find a new host for my site. I happen to be already using Linode for some app development, so I could have just published behind my own HTTP server. Believe it or not, there is an even more frictionless way: GitHub Pages. It supports custom domains for free and all you have to do is push your updates to your username.github.io repo master for your changes to be published. You can find some straight forward instructions on how to do this here and here. With this done, my workflow now pretty much consists of firing up jekyll locally using jekyll serve --watch --draft, writing my content, previewing it under http://localhost:4000 and pushing it to master when satisfied. Perfect.
The only other lose ends I had to take care of were:
Migrating WordPress content to Jekyll
that was easily done using the built-in wp import utility in Jekyll. I exported my old posts into a wordpress.xml file using the built-in WordPress export feature, made sure hpricot was installed running gem install hpricot and finally just executed the following at the root of my Jekyll project:
$ ruby -rubygems -e 'require "jekyll/jekyll-import/wordpressdotcom";
    JekyllImport::WordpressDotCom.process({ :source => "wordpress.xml" })'
This re-created all my old posts under <jekyll_root>/_posts as HTML files. I did have to manually tweak some of the HTML for proper formatting, so it wasn’t perfect out-of-the-box but it wasn’t too bad, just some missing <p></p> tags.
Finally, I had to maintain the URL structure of my legacy posts and pages which was prefixed with the path /blog in WordPress but no longer in Jekyll. I first looked into the jekyll_alias_generator plugin which seemed to work perfectly locally but not once on GitHub pages. I found out quickly that GitHib runs Jekyll in --safe mode for security reasons, so if I want plugins to work one day, I’ll have to just publish the locally generated _site folder instead of the Jekyll source files. So while I pondered the repurcusions of that on my friectionless blogging requirements, I instead resorted to using the permalink front-matter variable and setting it to the full legacy URL of my previous posts. Done.
Picking a Jekyll theme
You can go with the default Jekyll look or roll your own if you are so inclined. There are also a few available themes you can find around the web. I picked up Left which I found via http://jekyllthemes.org/.
Pointing the DNS entries to GitHub’s servers
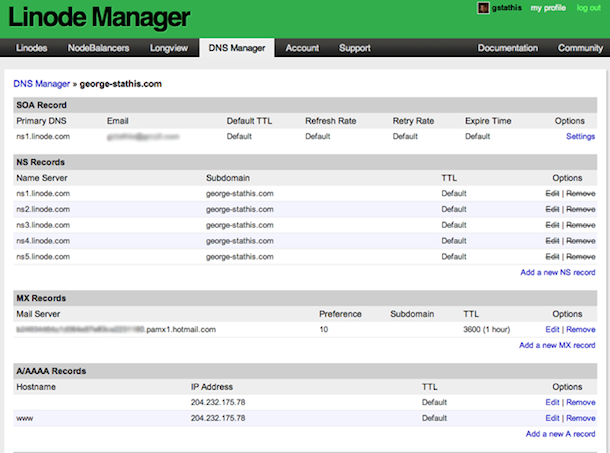
This is only necessary if you have your own domain which I did. Like I mentioned earlier, I happen to already have a Linode instance which comes with Managed DNS. So all I had to do was setup a new Domain Zone and point to the A Records to 204.232.175.78 as explained here. This is what it looks like in DNS Manager:
 My domain is registered with register.com, so the next step was to log in and point to the Linode name servers:

Done! In 10 to 20 minutes, the domain was redirecting to the GitHub pages site. Last step: email hosting.
From Yahoo! Email to Outlook.com
With Yahoo!, email hosting came built-in. For years my custom domain email addresses were hosted at Yahoo! and forwarded to my Gmail account. But once I switched away, I needed to find a new home for emails. Enter Outlook.com.
Before you roll your eyes thinking of the old Hotmail client, you should really check out the new Outlook.com. I must admit that once I switched to Gmail for all my email needs, I had pretty much relegated my Hotmail account as the catch all spam dumping ground. But the new client seems to be much better by leaps and bounds.
Having said that, I wasn’t about to switch back. All I needed was a free email hosting service to which I could point my MX records and then forward back to Gmail. It just so happens that Outlook.com provides just that. Here are the steps I followed to take advantage of it:
- Headed to https://domains.live.com/ and created a new Custom Domain
-
Once the registration was done, they provided instructions for how to setup the MX records to prove the domain ownership:
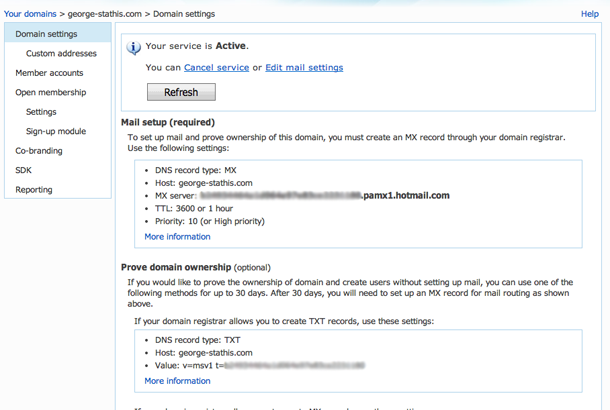
Another recommended setting was to create a TXT record to for other mail servers to trust email originating from the domain:
  DNS record type: TXT
  Host: george-stathis.com
  Value: v=spf1 include:hotmail.com ~all
  TTL: 3600 or 1 hour (if requested)
Once those were plugged into the Linode DNS Manager, I just had to wait for about 15-30 minutes for the changes to propagate before I started receiving emails in my new Outlook.com account.
- Email forwarding was not immediately available without a verification step: they sent a code via SMS and I had to enter it back for the feature to be enabled. Makes sense to try deter spammers but I don’t think it’s enough to deter those that are really determined.
Wordpress Free!
That was it! I’m now free from Yahoo! Hosting and hosted free on GitHub pages and Outlook.com. The only cost is the $20/month on Linode but that was an existing cost for me. Plus Linode affords me a lot more in terms of application hosting environment than Yahoo! Hosting ever could not to mention the DNS Management features that made all this possible.
If you try this yourself and get stuck along the way or have questions, don’t hesitate to post a comment below or email me.